Digitizing Services
How to Digitize for Embroidery: Beginner Guide 2026
Jun
How to Digitize for Embroidery: A Beginner’s Step-by-Step Guide (2026 Edition)
Embroidery has come a long way from traditional hand stitching. Today, businesses, hobbyists, and professional embroiderers rely on digital technology to transform artwork into beautiful stitched designs. If you’re new to the process, learning how to digitize for embroidery may seem overwhelming at first. However, with the right approach and tools, anyone can understand the basics and create high-quality embroidery files.
In this beginner-friendly guide, you’ll learn what embroidery digitizing is, why it matters, and how to digitize designs step by step in 2026. Whether you’re planning to create custom logos, personalized gifts, or commercial embroidery projects, this guide will help you get started confidently.
What Does It Mean to Digitize for Embroidery?
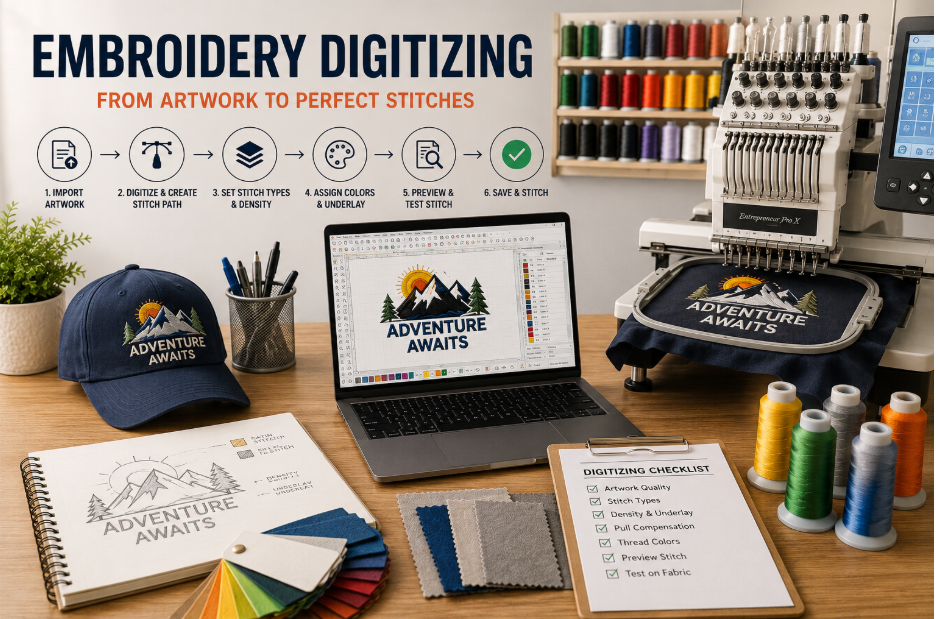
To digitize for embroidery means converting artwork, images, or logos into a digital embroidery file that an embroidery machine can read and stitch.
Unlike a standard image file such as JPG or PNG, embroidery machines require specific instructions that tell the machine:
- Where stitches should start and stop
- What stitch types to use
- Stitch direction
- Stitch density
- Thread color changes
- Underlay settings
The process of creating these instructions is called embroidery digitizing.
A well-digitized design produces clean, professional embroidery, while poor digitizing can result in thread breaks, puckering, and distorted designs.
Why Is Embroidery Digitizing Important?
Many beginners assume that embroidery machines automatically convert images into stitches. Unfortunately, it doesn’t work that way.
Professional embroidery digitizing ensures:
- Better stitch quality
- Reduced thread breaks
- Accurate logo reproduction
- Faster machine operation
- Less fabric distortion
- Professional-looking results
This is why many businesses choose a professional embroidery digitizing service when handling complex logos and detailed artwork.
Tools You Need Before You Start
Before you digitize for embroidery, gather the following tools:
Embroidery Digitizing Software
Popular options in 2026 include:
- Wilcom Embroidery Studio
- Hatch Embroidery
- Brother PE-Design
- Embrilliance
- Chroma Inspire
High-Quality Artwork
For best results, use:
- Vector files (AI, EPS, SVG)
- High-resolution PNG files
- Clean logo artwork
Avoid blurry or low-resolution images whenever possible.
Embroidery Machine Format Knowledge
Different machines use different file formats:
- DST
- PES
- EXP
- JEF
- VP3
Always know which format your machine requires before exporting.
Step 1: Analyze the Design
The first step in embroidery digitizing is studying the artwork carefully.
Ask yourself:
- How large will the design be?
- What fabric will be used?
- Are there small details that need simplification?
- Which stitch types work best?
Not every image is suitable for embroidery exactly as it appears on screen.
For example, tiny text may need enlargement, while intricate gradients often require simplification.
Step 2: Import the Artwork
Open your embroidery digitizing software and import the image.
At this stage:
- Resize the artwork correctly
- Position it properly
- Lock the image in place
- Prepare it for tracing
Accurate sizing is critical because stitch density changes when designs are resized later.
Step 3: Choose Appropriate Stitch Types
One of the most important parts of learning how to digitize for embroidery is understanding stitch types.
Satin Stitch
Best for:
- Text
- Borders
- Small shapes
Advantages:
- Smooth appearance
- Excellent coverage
- Professional finish
Fill Stitch
Best for:
- Large areas
- Backgrounds
- Logos
Advantages:
- Efficient stitching
- Strong durability
- Attractive texture
Running Stitch
Best for:
- Fine details
- Outlines
- Decorative elements
Advantages:
- Minimal thread usage
- Clean detail work
Choosing the right stitch type significantly affects the final appearance.
Step 4: Create the Stitch Path
The stitch path determines how the machine moves through the design.
A logical stitch sequence helps:
- Reduce jump stitches
- Minimize trims
- Improve production speed
- Create cleaner embroidery
Start with background elements and move toward foreground details.
Professional digitizers always think about machine efficiency while creating stitch paths.
Step 5: Set Stitch Direction
Stitch direction affects texture, shine, and overall design quality.
Changing stitch angles can:
- Add depth
- Create visual contrast
- Prevent fabric pulling
- Improve logo readability
For example, neighboring sections should often have different stitch directions to make them visually distinct.
This is a key principle used in professional embroidery digitizing.
Step 6: Add Underlay Stitches
Underlay is the foundation of embroidery.
It helps:
- Stabilize fabric
- Improve stitch coverage
- Reduce distortion
- Enhance design quality
Common underlay types include:
- Edge run
- Center walk
- Zigzag underlay
- Tatami underlay
Skipping underlay often results in poor embroidery quality.
Step 7: Adjust Stitch Density
Stitch density refers to how closely stitches are placed together.
Too much density can cause:
- Thread breaks
- Needle breaks
- Stiff embroidery
- Fabric puckering
Too little density may create:
- Gaps in stitching
- Poor coverage
- Unprofessional appearance
Always adjust density based on:
- Fabric type
- Thread type
- Design complexity
Modern digitizing software in 2026 often includes automatic recommendations, but manual adjustments still provide the best results.
Step 8: Optimize Pull Compensation
When embroidery stitches are sewn, fabric naturally shifts.
This phenomenon is called pull.
Pull compensation helps offset this movement by slightly widening design elements.
Without pull compensation:
- Text may become narrow
- Shapes may distort
- Borders may misalign
Proper compensation is essential for professional-quality embroidery.
Step 9: Assign Thread Colors
Now it’s time to assign thread colors.
Choose colors that closely match the original artwork.
Many digitizing programs include:
- Madeira thread charts
- Isacord color libraries
- Robison-Anton charts
- Brother thread collections
Organize color changes efficiently to reduce production time.
Step 10: Run a Virtual Simulation
Most embroidery software provides a stitch simulator.
Before exporting:
- Watch the stitching sequence
- Check for gaps
- Inspect overlaps
- Review trims and jumps
Simulation allows you to identify problems before stitching on fabric.
This step can save both time and materials.
Step 11: Test Stitch the Design
A test sew-out is one of the most important steps when you digitize for embroidery.
Even experienced digitizers test every design.
During testing, check:
- Registration accuracy
- Fabric stability
- Thread tension
- Design clarity
- Overall appearance
Make adjustments if necessary.
Never assume a design is perfect without testing.
Common Mistakes Beginners Should Avoid
Learning embroidery digitizing involves trial and error. Avoid these common mistakes:
Using Low-Quality Artwork
Poor source images lead to poor embroidery results.
Overcomplicating Designs
Simpler designs usually stitch better than highly detailed artwork.
Ignoring Fabric Type
Different fabrics require different digitizing settings.
Excessive Stitch Density
Too many stitches can damage both fabric and machine performance.
Skipping Test Runs
Testing prevents costly production errors.
Should You Use an Embroidery Digitizing Service?
While learning embroidery digitizing is valuable, some projects require professional expertise.
An experienced embroidery digitizing service can help when:
- Designs contain complex details
- Corporate logos require precision
- Large production runs are planned
- Fast turnaround is needed
Professional digitizers understand advanced stitch techniques, fabric behavior, and machine optimization that can save time and improve results.
For businesses handling client work, outsourcing can often be more cost-effective than correcting poorly digitized files.
Tips for Better Embroidery Digitizing in 2026
Technology continues to improve, but the fundamentals remain the same.
Follow these best practices:
- Start with clean artwork
- Keep designs embroidery-friendly
- Learn stitch behavior
- Test every file
- Use proper stabilization
- Study professional digitized designs
- Practice regularly
The more projects you digitize, the faster your skills will develop.
The Future of Embroidery Digitizing
In 2026, embroidery software is becoming smarter and more user-friendly.
New advancements include:
- Enhanced auto-digitizing tools
- Real-time stitch previews
- Cloud-based design management
- Faster processing speeds
- Improved stitch optimization
Despite these improvements, human expertise remains essential. Successful embroidery digitizing still relies on understanding stitch mechanics, fabric characteristics, and design principles.
Frequently Asked Questions
1. What software is best for beginners to digitize for embroidery?
Hatch Embroidery, Embrilliance, and Brother PE-Design are popular beginner-friendly options due to their intuitive interfaces and learning resources.
2. Can I convert a JPG directly into an embroidery file?
Not accurately. Images must be digitized to create stitch instructions before they can be embroidered correctly.
3. How long does embroidery digitizing take?
Simple designs may take 15–30 minutes, while complex logos can require several hours depending on detail and stitch complexity.
4. Is auto-digitizing software reliable?
Auto-digitizing can provide a starting point, but manual editing is usually necessary for professional results.
5. Why does my embroidery design look different from the original image?
Fabric movement, stitch limitations, density settings, and pull compensation can all affect the final stitched appearance.
Conclusion
Learning how to digitize for embroidery is one of the most valuable skills in modern embroidery. While the process requires patience and practice, understanding stitch types, density, underlay, pull compensation, and testing will dramatically improve your results.
Whether you’re creating custom apparel, promotional products, or personalized gifts, mastering embroidery digitizing allows you to transform artwork into professional-quality stitched designs. Start with simple projects, refine your technique, and continue learning from each design you create.
If you need flawless results for business logos or complex artwork, consider partnering with a professional embroidery digitizing service to ensure your designs stitch perfectly every time.
How to Digitize for Embroidery: A Beginner’s Step-by-Step Guide (2026 Edition)
Embroidery has come a long way from traditional hand stitching. Today, businesses, hobbyists, and professional embroiderers rely on digital technology to transform artwork into beautiful stitched designs. If you’re new to the process, learning how to digitize for embroidery may seem overwhelming at first. However, with the right approach and tools, anyone can understand the basics and create high-quality embroidery files.
In this beginner-friendly guide, you’ll learn what embroidery digitizing is, why it matters, and how to digitize designs step by step in 2026. Whether you’re planning to create custom logos, personalized gifts, or commercial embroidery projects, this guide will help you get started confidently.
What Does It Mean to Digitize for Embroidery?
To digitize for embroidery means converting artwork, images, or logos into a digital embroidery file that an embroidery machine can read and stitch.
Unlike a standard image file such as JPG or PNG, embroidery machines require specific instructions that tell the machine:
- Where stitches should start and stop
- What stitch types to use
- Stitch direction
- Stitch density
- Thread color changes
- Underlay settings
The process of creating these instructions is called embroidery digitizing.
A well-digitized design produces clean, professional embroidery, while poor digitizing can result in thread breaks, puckering, and distorted designs.
Why Is Embroidery Digitizing Important?
Many beginners assume that embroidery machines automatically convert images into stitches. Unfortunately, it doesn’t work that way.
Professional embroidery digitizing ensures:
- Better stitch quality
- Reduced thread breaks
- Accurate logo reproduction
- Faster machine operation
- Less fabric distortion
- Professional-looking results
This is why many businesses choose a professional embroidery digitizing service when handling complex logos and detailed artwork.
Tools You Need Before You Start
Before you digitize for embroidery, gather the following tools:
Embroidery Digitizing Software
Popular options in 2026 include:
- Wilcom Embroidery Studio
- Hatch Embroidery
- Brother PE-Design
- Embrilliance
- Chroma Inspire
High-Quality Artwork
For best results, use:
- Vector files (AI, EPS, SVG)
- High-resolution PNG files
- Clean logo artwork
Avoid blurry or low-resolution images whenever possible.
Embroidery Machine Format Knowledge
Different machines use different file formats:
- DST
- PES
- EXP
- JEF
- VP3
Always know which format your machine requires before exporting.
Step 1: Analyze the Design
The first step in embroidery digitizing is studying the artwork carefully.
Ask yourself:
- How large will the design be?
- What fabric will be used?
- Are there small details that need simplification?
- Which stitch types work best?
Not every image is suitable for embroidery exactly as it appears on screen.
For example, tiny text may need enlargement, while intricate gradients often require simplification.
Step 2: Import the Artwork
Open your embroidery digitizing software and import the image.
At this stage:
- Resize the artwork correctly
- Position it properly
- Lock the image in place
- Prepare it for tracing
Accurate sizing is critical because stitch density changes when designs are resized later.
Step 3: Choose Appropriate Stitch Types
One of the most important parts of learning how to digitize for embroidery is understanding stitch types.
Satin Stitch
Best for:
- Text
- Borders
- Small shapes
Advantages:
- Smooth appearance
- Excellent coverage
- Professional finish
Fill Stitch
Best for:
- Large areas
- Backgrounds
- Logos
Advantages:
- Efficient stitching
- Strong durability
- Attractive texture
Running Stitch
Best for:
- Fine details
- Outlines
- Decorative elements
Advantages:
- Minimal thread usage
- Clean detail work
Choosing the right stitch type significantly affects the final appearance.
Step 4: Create the Stitch Path
The stitch path determines how the machine moves through the design.
A logical stitch sequence helps:
- Reduce jump stitches
- Minimize trims
- Improve production speed
- Create cleaner embroidery
Start with background elements and move toward foreground details.
Professional digitizers always think about machine efficiency while creating stitch paths.
Step 5: Set Stitch Direction
Stitch direction affects texture, shine, and overall design quality.
Changing stitch angles can:
- Add depth
- Create visual contrast
- Prevent fabric pulling
- Improve logo readability
For example, neighboring sections should often have different stitch directions to make them visually distinct.
This is a key principle used in professional embroidery digitizing.
Step 6: Add Underlay Stitches
Underlay is the foundation of embroidery.
It helps:
- Stabilize fabric
- Improve stitch coverage
- Reduce distortion
- Enhance design quality
Common underlay types include:
- Edge run
- Center walk
- Zigzag underlay
- Tatami underlay
Skipping underlay often results in poor embroidery quality.
Step 7: Adjust Stitch Density
Stitch density refers to how closely stitches are placed together.
Too much density can cause:
- Thread breaks
- Needle breaks
- Stiff embroidery
- Fabric puckering
Too little density may create:
- Gaps in stitching
- Poor coverage
- Unprofessional appearance
Always adjust density based on:
- Fabric type
- Thread type
- Design complexity
Modern digitizing software in 2026 often includes automatic recommendations, but manual adjustments still provide the best results.
Step 8: Optimize Pull Compensation
When embroidery stitches are sewn, fabric naturally shifts.
This phenomenon is called pull.
Pull compensation helps offset this movement by slightly widening design elements.
Without pull compensation:
- Text may become narrow
- Shapes may distort
- Borders may misalign
Proper compensation is essential for professional-quality embroidery.
Step 9: Assign Thread Colors
Now it’s time to assign thread colors.
Choose colors that closely match the original artwork.
Many digitizing programs include:
- Madeira thread charts
- Isacord color libraries
- Robison-Anton charts
- Brother thread collections
Organize color changes efficiently to reduce production time.
Step 10: Run a Virtual Simulation
Most embroidery software provides a stitch simulator.
Before exporting:
- Watch the stitching sequence
- Check for gaps
- Inspect overlaps
- Review trims and jumps
Simulation allows you to identify problems before stitching on fabric.
This step can save both time and materials.
Step 11: Test Stitch the Design
A test sew-out is one of the most important steps when you digitize for embroidery.
Even experienced digitizers test every design.
During testing, check:
- Registration accuracy
- Fabric stability
- Thread tension
- Design clarity
- Overall appearance
Make adjustments if necessary.
Never assume a design is perfect without testing.
Common Mistakes Beginners Should Avoid
Learning embroidery digitizing involves trial and error. Avoid these common mistakes:
Using Low-Quality Artwork
Poor source images lead to poor embroidery results.
Overcomplicating Designs
Simpler designs usually stitch better than highly detailed artwork.
Ignoring Fabric Type
Different fabrics require different digitizing settings.
Excessive Stitch Density
Too many stitches can damage both fabric and machine performance.
Skipping Test Runs
Testing prevents costly production errors.
Should You Use an Embroidery Digitizing Service?
While learning embroidery digitizing is valuable, some projects require professional expertise.
An experienced embroidery digitizing service can help when:
- Designs contain complex details
- Corporate logos require precision
- Large production runs are planned
- Fast turnaround is needed
Professional digitizers understand advanced stitch techniques, fabric behavior, and machine optimization that can save time and improve results.
For businesses handling client work, outsourcing can often be more cost-effective than correcting poorly digitized files.
Tips for Better Embroidery Digitizing in 2026
Technology continues to improve, but the fundamentals remain the same.
Follow these best practices:
- Start with clean artwork
- Keep designs embroidery-friendly
- Learn stitch behavior
- Test every file
- Use proper stabilization
- Study professional digitized designs
- Practice regularly
The more projects you digitize, the faster your skills will develop.
The Future of Embroidery Digitizing
In 2026, embroidery software is becoming smarter and more user-friendly.
New advancements include:
- Enhanced auto-digitizing tools
- Real-time stitch previews
- Cloud-based design management
- Faster processing speeds
- Improved stitch optimization
Despite these improvements, human expertise remains essential. Successful embroidery digitizing still relies on understanding stitch mechanics, fabric characteristics, and design principles.
Frequently Asked Questions
1. What software is best for beginners to digitize for embroidery?
Hatch Embroidery, Embrilliance, and Brother PE-Design are popular beginner-friendly options due to their intuitive interfaces and learning resources.
2. Can I convert a JPG directly into an embroidery file?
Not accurately. Images must be digitized to create stitch instructions before they can be embroidered correctly.
3. How long does embroidery digitizing take?
Simple designs may take 15–30 minutes, while complex logos can require several hours depending on detail and stitch complexity.
4. Is auto-digitizing software reliable?
Auto-digitizing can provide a starting point, but manual editing is usually necessary for professional results.
5. Why does my embroidery design look different from the original image?
Fabric movement, stitch limitations, density settings, and pull compensation can all affect the final stitched appearance.
Conclusion
Learning how to digitize for embroidery is one of the most valuable skills in modern embroidery. While the process requires patience and practice, understanding stitch types, density, underlay, pull compensation, and testing will dramatically improve your results.
Whether you’re creating custom apparel, promotional products, or personalized gifts, mastering embroidery digitizing allows you to transform artwork into professional-quality stitched designs. Start with simple projects, refine your technique, and continue learning from each design you create.
If you need flawless results for business logos or complex artwork, consider partnering with a professional embroidery digitizing service to ensure your designs stitch perfectly every time.